
Biến ESP32 Thành Điểm Truy Cập Wi-Fi và Cập Nhật Firmware qua Giao Diện Web
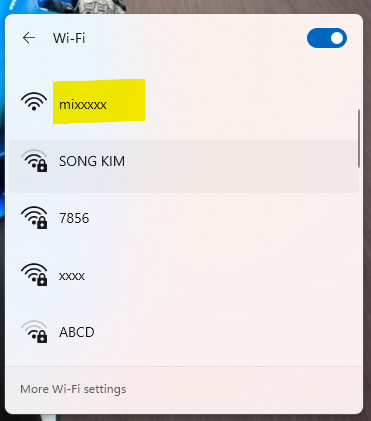
Trong bài viết này, chúng ta sẽ nạp code biến chiếc ESP32 của bạn thành một điểm truy cập Wi-Fi, đồng thời cung cấp một giao diện web đơn giản để cập nhật firmware. Giải pháp này mang lại sự tiện lợi tối đa cho việc quản lý và nâng cấp phần mềm của thiết bị, đặc biệt là trong các trường hợp triển khai ở những vị trí khó tiếp cận.
#include <Arduino.h>
#include <WiFi.h>
#include <WiFiClient.h>
#include <WebServer.h>
#include <ESPmDNS.h>
#include <Update.h>

const char* host = "esp32";
const char* ssid = "mixxxxx";
const char* password = ""; //  passwd

const int ledPin = 15; // Use pin GPIO15 to control LED

WebServer server(80);

/* Style */
String style =
"<style>"
"#file-input,input{width:100%;height:44px;border-radius:4px;margin:10px auto;font-size:15px}"
"input{background:#f1f1f1;border:0;padding:0 15px}body{background:#2ecc71;font-family:sans-serif;font-size:14px;color:#777}"
"#file-input{padding:0;border:1px solid #ddd;line-height:44px;text-align:left;display:block;cursor:pointer}"
"#bar,#prgbar{background-color:#f1f1f1;border-radius:10px}#bar{background-color:#3498db;width:0%;height:10px}"
"form{background:#fff;max-width:258px;margin:75px auto;padding:30px;border-radius:5px;text-align:center}"
".btn{background:#3498db;color:#fff;cursor:pointer}</style>";

/* Server Index Page */
String serverIndex =
"<script>"
"function sub(obj){"
"var fileName = obj.value.split('\\\\');"
"document.getElementById('file-input').innerHTML = '   '+ fileName[fileName.length-1];"
"};"
"document.addEventListener('DOMContentLoaded', function() {"
"document.getElementById('upload_form').addEventListener('submit', function(e) {"
"e.preventDefault();"
"var form = document.getElementById('upload_form');"
"var data = new FormData(form);"
"var xhr = new XMLHttpRequest();"
"xhr.open('POST', '/update-firmware', true);"
"xhr.upload.addEventListener('progress', function(evt) {"
"if (evt.lengthComputable) {"
"var percentComplete = Math.round((evt.loaded / evt.total) * 100);"
"document.getElementById('prg').innerHTML = 'progress: ' + percentComplete + '%';"
"document.getElementById('bar').style.width = percentComplete + '%';"
"}"
"}, false);"
"xhr.onload = function() {"
"if (xhr.status === 200) {"
"console.log('success!');"
"alert('update-firmware OK');"
"} else {"
"console.log('error!');"
"}"
"};"
"xhr.send(data);"
"});"
"});"
"</script>"
"<form method='POST' action='/update-firmware' enctype='multipart/form-data' id='upload_form'>"
"<input type='file' name='update' id='file' onchange='sub(this)' style=display:none>"
"<label id='file-input' for='file'>   Choose file...</label>"
"<input type='submit' class=btn value='Update'>"
"<br><br>"
"<div id='prg'></div>"
"<br><div id='prgbar'><div id='bar'></div></div><br></form>" + style;

/* setup function */
void setup(void) {
  Serial.begin(115200);

  // Set up ESP32 as Access Point
  WiFi.softAP(ssid, password);

  IPAddress IP(10, 10, 10, 1); // Set AP's IP address
  IPAddress subnet(255, 255, 255, 0); // Set subnet
  WiFi.softAPConfig(IP, IP, subnet);

  // Print IP infor
  Serial.println("");
  Serial.print("AP IP address: ");
  Serial.println(WiFi.softAPIP());

  // Turn on LED when WiFi connection is successful
  pinMode(ledPin, OUTPUT);
  digitalWrite(ledPin, HIGH);

  /*use mdns for host name resolution*/
  if (!MDNS.begin(host)) { //http://esp32
    Serial.println("Error setting up MDNS responder!");
    while (1) {
      delay(1000);
    }
  }
  Serial.println("mDNS responder started");

  /*handling uploading firmware file */
  server.on("/update-firmware", HTTP_POST, []() {
    server.sendHeader("Connection", "close");
    server.send(200, "text/plain", (Update.hasError()) ? "FAIL" : "OK");
    if (!Update.hasError()) {
      Serial.println("update-firmware OK");
      ESP.restart(); // Khởi động lại ESP32 sau khi cập nhật thành công
    }
  }, []() {
    HTTPUpload& upload = server.upload();
    if (upload.status == UPLOAD_FILE_START) {
      Serial.printf("Update: %s\n", upload.filename.c_str());
      if (!Update.begin(UPDATE_SIZE_UNKNOWN)) { //start with max available size
        Update.printError(Serial);
      }
    } else if (upload.status == UPLOAD_FILE_WRITE) {
      /* flashing firmware to ESP*/
      if (Update.write(upload.buf, upload.currentSize) != upload.currentSize) {
        Update.printError(Serial);
      }
    } else if (upload.status == UPLOAD_FILE_END) {
      if (Update.end(true)) { //true to set the size to the current progress
        Serial.printf("Update Success: %u\n", upload.totalSize);
      } else {
        Update.printError(Serial);
      }
    }
  });

  // Serve the upload page directly
  server.on("/", HTTP_GET, []() {
    server.sendHeader("Connection", "close");
    server.send(200, "text/html", serverIndex); // Directly serve the upload page
  });

  server.begin();
}

void loop(void) {
  server.handleClient();
  delay(1);
}
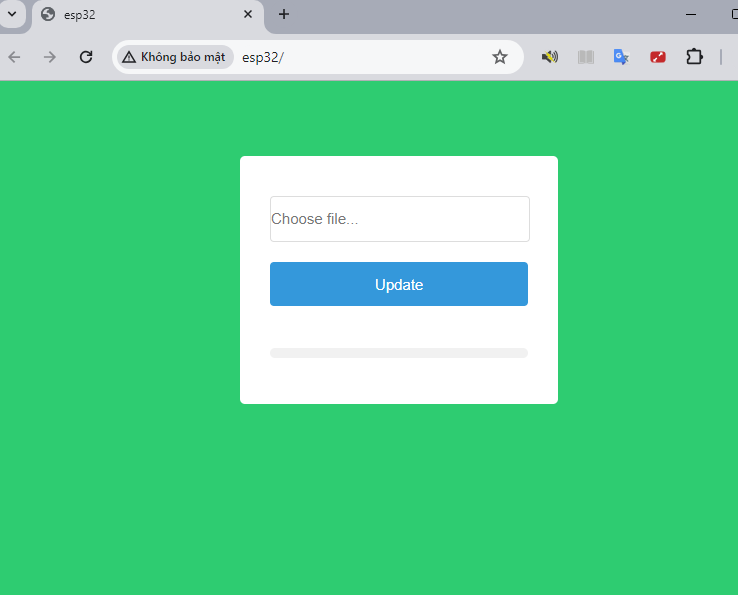
Sau kết nối với wifi phát ra trên esp32 này để truy cập vào trang update firmware hãy gõ địa chỉ http://esp32/ hoặc http://10.10.10.1 . Nếu cần hãy thay đổi thông tin sau theo ý muốn.
const char* host = "esp32"; //  local host
const char* ssid = "mixxxxx"; // tên wifi
const char* password = "passwd"; //  mật khẩu

IPAddress IP(10, 10, 10, 1); // Thiết lập địa chỉ IP của AP
IPAddress subnet(255, 255, 255, 0); // Thiết lập mặt nạ mạng
Chức năng chính của code
Khi ESP32 được khởi động, nó sẽ thiết lập một mạng Wi-Fi với tên (SSID) và mật khẩu đã được chỉ định. Sau khi kết nối thành công, bạn có thể truy cập vào mạng Wi-Fi này và sử dụng địa chỉ IP 10.10.10.1 để mở giao diện web trên trình duyệt của mình.
Giao diện web trực quan
Giao diện web được thiết kế với một trang đơn giản và thân thiện với người dùng, bao gồm các thành phần cơ bản như nút chọn tệp và nút tải lên.
Người dùng chỉ cần chọn tệp firmware cần cập nhật và nhấn “Update”. Trang web cũng hiển thị một thanh tiến trình, giúp người dùng dễ dàng theo dõi quá trình tải lên.
Quá trình cập nhật firmware
- Bắt đầu tải lên: ESP32 nhận diện tệp firmware mới và chuẩn bị cho quá trình cập nhật.
- Ghi dữ liệu: Tệp firmware được chia thành nhiều phần nhỏ và từng phần được ghi vào bộ nhớ của ESP32.
- Kết thúc cập nhật: Sau khi toàn bộ tệp firmware được ghi thành công, ESP32 xác nhận quá trình hoàn tất và tự khởi động lại để áp dụng phiên bản firmware mới.
Sự tiện lợi và an toàn
Đèn LED trên ESP32 sẽ sáng lên khi thiết bị đã sẵn sàng để kết nối Wi-Fi, giúp người dùng dễ dàng nhận biết trạng thái của thiết bị. Hệ thống mDNS cũng được sử dụng, cho phép người dùng truy cập ESP32 bằng tên miền “esp32.local” thay vì phải nhớ địa chỉ IP.
LƯU Ý rằng nếu file firmware.bin mà bạn upload lên không có chức năng upload firmware thì sẽ không còn tính năng này nữa.
Dưới đây là phần giải thích về đoạn mã Arduino trên:
Thư viện
– `#include <Arduino.h>`: Thư viện cơ bản cho lập trình Arduino.
– `#include <WiFi.h>`: Thư viện cho kết nối WiFi.
– `#include <WiFiClient.h>`: Thư viện cho việc tạo kết nối WiFi client.
– `#include <WebServer.h>`: Thư viện cho việc tạo một Web Server trên ESP32.
– `#include <ESPmDNS.h>`: Thư viện cho Multicast DNS (mDNS) để cho phép truy cập thiết bị thông qua tên miền thay vì địa chỉ IP.
– `#include <Update.h>`: Thư viện cho việc cập nhật firmware qua mạng (OTA).
Biến toàn cục
– `const char* host = “esp32”;`: Tên máy chủ để truy cập thông qua mDNS.
– `const char* ssid = “mixxxxx”;`: Tên SSID cho mạng WiFi.
– `const char* password = “”;`: Mật khẩu cho mạng WiFi.
– `const int ledPin = 15;`: Pin GPIO15 được sử dụng để điều khiển đèn LED.
– `WebServer server(80);`: Tạo một Web Server chạy trên cổng 80.
Biến chuỗi cho giao diện web
– `String style`: Chuỗi chứa mã CSS cho giao diện web.
– `String serverIndex`: Chuỗi chứa mã HTML và JavaScript cho trang upload firmware.
Hàm `setup()`
– `Serial.begin(115200);`: Khởi động giao tiếp serial với tốc độ 115200 baud.
– `WiFi.softAP(ssid, password);`: Thiết lập ESP32 như một Access Point (AP) với SSID và mật khẩu.
– `WiFi.softAPConfig(IP, IP, subnet);`: Thiết lập địa chỉ IP và subnet cho AP.
– `Serial.println(WiFi.softAPIP());`: In địa chỉ IP của AP lên Serial Monitor.
– `pinMode(ledPin, OUTPUT);`: Thiết lập pin GPIO15 làm đầu ra.
– `digitalWrite(ledPin, HIGH);`: Bật đèn LED.
– `MDNS.begin(host);`: Thiết lập mDNS để truy cập thiết bị thông qua tên miền `http://esp32`.
Cài đặt Server
– `server.on(“/update-firmware”, HTTP_POST, …);`: Định nghĩa hàm xử lý cho việc upload firmware.
– Khi nhận POST request tại `/update-firmware`, nó sẽ xử lý file tải lên và cập nhật firmware.
– `server.on(“/”, HTTP_GET, …);`: Định nghĩa hàm xử lý cho việc tải trang web upload firmware.
Hàm `loop()`
– `server.handleClient();`: Xử lý các yêu cầu từ client đến Web Server.
– `delay(1);`: Tạm dừng một khoảng thời gian ngắn (1ms).
Chi tiết các xử lý upload firmware
– `HTTPUpload& upload = server.upload();`: Nhận dữ liệu tải lên.
– `Update.begin(UPDATE_SIZE_UNKNOWN)`: Bắt đầu quá trình cập nhật firmware.
– `Update.write(upload.buf, upload.currentSize)`: Ghi dữ liệu firmware lên bộ nhớ.
– `Update.end(true)`: Kết thúc quá trình cập nhật và thiết lập kích thước hiện tại.
– `ESP.restart()`: Khởi động lại ESP32 sau khi cập nhật thành công.
Tổng kết
Mã nguồn này mang lại một giải pháp hiệu quả cho việc quản lý và cập nhật firmware của thiết bị ESP32 thông qua mạng không dây. Với giao diện web đơn giản và dễ sử dụng, việc duy trì và nâng cấp firmware trở nên dễ dàng hơn bao giờ hết.